Saturday, February 27, 2010

Baking My Nerves Away

I really love eating food and I really love cooking food. Cooking relaxes me and puts me in a peaceful state. Baking on the other hand...oh baking! Baking (anything besides bread) stresses me out. And I mean, really stresses me out! I babble on and on and I look at the recipe over and over again before I do ANYTHING...I become a nervous wreck. I get nervous that my measurements will be wrong or I'll beat the mixture too many times or I'll forget it in the oven...there's so many things that could go wrong! But lately, I've been trying to get more used to baking so that one day, it will be natural and become as relaxing to me as cooking. I've gotten to the point where some of my fears have worn off but the nerves are still there and they've turned into more of an excitement.

For my birthday, I went shopping with my mom to get some new cooking and baking supplies. I got some piping materials and I've been dying to use them, so this weekend, I decided to make cupcakes! It was the perfect way to spend a weekend afternoon. I've been really wanting to try a recipe for pound cake cupcakes. It is a "cold oven pound cake" recipe, so you don't preheat the oven and the cupcakes bake at a very low heat. I thought I'd pair it with a buttercream frosting and I went to the store in search of some sort of jam or preserve to spice it up. When I saw the lemon curd, I couldn't resist! 

Pound Cake Cupcakes with Lemon Curd Buttercream Frosting
Cupcakes, adapted from Cupcake Project

Makes 12 cupcakes.

Ingredients:
For the Cupcake:
3/4 Cup unsalted butter
1 1/2 Cups sugar
3 Egg
1 1/2 Cups Sifted cake flour or all purpose flour
1/2 Cup milk
1/2 Teaspoon vanilla extract
1/2 Teaspoon almond extract
For the Frosting:
1/2 Cup butter at room temperature
1/3 Cup lemon curd
Lemon juice from 1/2 lemon
Lemon zest from 1/2 lemon
1 1/2 Cups powdered sugar
1/2 Teaspoon vanilla extract

Directions:
Cream together the butter and the sugar. Beat in the eggs, one at a time. Beat in half of the flour, then half of the milk, then the rest of the flour and the rest of the milk. Beat in the extracts and continue beating on medium-high speed for a few minutes. Fill each of the cupcake liners 3/4 full. Without preheating, place the cupcakes in the oven and then turn the oven on to 275 degrees and bake for 1 hour. I left mine in a couple minutes too long. I wish they hadn't gotten so golden on top. Make sure you watch them carefully! Let them cool completely on a cooling rack before frosting them.

To make the frosting, beat the butter until smooth. Beat in the lemon curd, followed by the lemon juice, zest, powdered sugar, and vanilla. Add more sugar if it needs to be stiffer. This should be able to frost all 12 cupcakes.

I had so much fun piping the frosting for my first time! My first few attempts looked really ridiculous, but I started to get the hang of it after a while. It was hard to apply even pressure the whole time, but with practice, I should get better. The cupcake was delicious! I loved the pound cake recipe. It was a little more dense than your average cupcake, but still moist and delicious. I was really happy with the buttercream too. I'm officially using lemon curd in everything I bake!

Thursday, February 25, 2010

Snacktime Really Shouldn't Involve Work

Okay here it is. My favorite snack. It's nothing fancy, it doesn't take much work and many of you have probably already had this, but I can't help but to stand up on my soap box and advocate for this tasty treat.

Avocado Toast

Ingredients:
1 Piece of bread...or 2 or 3. I just can't get enough.
1/2  avocado per piece of bread...or more or less, depending on your preference.
Butter
Salt

Directions:
Like I said before, this doesn't take much work at all. Toast your bread and spread some butter on top. Mash the avocado onto the toast and top with salt to taste.


Something is so satisfying about this simple snack. The avocado tastes so refreshing and homemade bread makes it even more delectable.

Wednesday, February 24, 2010

Bread and Braids

Whole Wheat Sandwich Bread
Adapted from My Kitchen Addiction, originally from King Arthur Flour Whole Grain Baking Cookbook

Ingredients:
2 Tablespoons orange juice
1 Cup lukewarm water
2 1/2 Teaspoons instant yeast (or one packet)
3 Tablespoons granulated sugar
1/2 Cup plain Greek yogurt
1/4 Cup canola oil
1 Teaspoon salt
1 Cup bread flour
3+ Cups white whole wheat flour

Directions:
In a large mixing bowl, combine the water, orange juice, yeast and sugar. Stir to dissolve. Make sure it’s all dissolved. Add the yogurt, canola oil, salt and bread flour. Beat the ingredients together vigorously, using a wooden spoon. This helps to start to develop the gluten in the bread flour. Start adding the bread flour, gradual while still mixing with the wooden spoon until the dough pulls away from the bowl and forms a ball. The amount of flour you will need will depend of factors such as humidity. Add enough so that the dough isn’t sticking to your hands. On a floured surface, knead the bread until the dough is smooth (about 6-8 minutes).
Place the dough in a lightly greased bowl. Cover it with a damp kitchen towel and let it rise until the dough has doubled in size. This should take about an hour or two. The dough has risen enough when the imprint of your fingers remains in the dough without filling back up.
This is where you take a break and enjoy the leftover Greek yogurt with some honey and berries and a cup of tea.
 When the dough is ready, punch it and form it into the shape of a loaf. If you would like to make the braid, take 1/3 of the dough and divide it into 3 strands and create a braid. Place the braid on top of the loaf and tuck in the ends.Place the loaf into a greased loaf pan and cover with the damp towel. Let it rise for another hour.
Preheat the oven to 350 degrees. Bake uncovered for 15 minutes and then cover with aluminum foil and bake for another 20-25 minutes.
Let the bread rest in the pan for a couple minutes and then transfer it to a cooling rack. Let cool for at least 30 minutes before cutting a piece.


I was pretty happy with this recipe as sandwich bread. I don’t think it really held up well to just eat a slice by itself but it was delicious as a sandwich, or toast. It was just dense enough to be sturdy without being too heavy.

“Good bread is the most fundamentally satisfying of all foods; and good bread with fresh butter, the greatest of feasts.” -James Beard

Tuesday, February 16, 2010

Another Addition to the Comfort List

Here it is. My mom has been asking for this post for weeks. I made this dish a while back, while I was visiting home and my whole family loved it. My mom has a list of her comfort foods which includes my Macaroni and Cheese, Thai Red Curry, Indian Chana Masala, and now this casserole. So if you're in need of a warm, comforting meal, try this one out!

Arroz Verde al Horno (Green Rice Casserole)
Adapted from Lottie + Doof

Ingredients:
1 Poblano chile, seeds removed
1 Green bell pepper, seeds removed
1/2 Cup fresh cilantro leaves, loosely packed
1/4 Cup Mexican oregano leaves, loosely packed
5 Cloves of garlic
4 Cups vegetable broth
4 Tablespoons unsalted butter
1 Cup chopped onion
2 Cups long grain rice
A few cups of water
1 1/2 Cups grated Oaxaca cheese
1 1/2 Cups grated Manchego cheese
1 Cup heavy cream

Directions:
Place the first six ingredients in a blender and puree. Heat butter in a large pot over medium heat. Add the onion and sauté for a couple minutes. Add the puree and bring to a boil. Add a couple of tablespoons of salt to taste. Add the rice to the broth and bring to a boil. Reduce the heat to low and simmer, covered. Every few minutes, stir the rice and add water as the broth becomes absorbed. Keep this up until the rice is thoroughly cooked. You don’t want it to have a crunch.
Meanwhile, preheat the oven to 350 degrees.
Combine the rice mixture with 2 cups of the cheeses and the cream. If you cannot find these cheeses, they can be replaced by mozzarella or quesadilla cheese. Place the mixture in a casserole dish and cover with the remaining cheese. Bake for 20 minutes and then turn the oven on to broil until the cheese browns on top.


This is a perfect winter casserole. The oregano gives it a really earthy taste and there is just the right spice, while the cheeses give it that comfort-factor.

Tuesday, February 9, 2010

Simple Staples

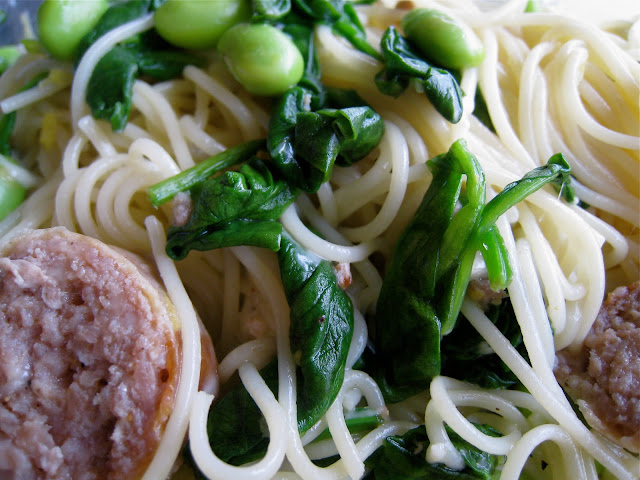
As I’ve said before, I really tried to stay away from pastas last quarter, but I’ve given up on that goal and I’m definitely happy to be back in the world of pasta. This dish, is perfect when I don’t have much time, but I want something delicious. Plus, I usually have all of the ingredients in my fridge and freezer.

Zesty Pasta with Sausage and Greens

Ingredients:
(This is for 1 pound of pasta, but I usually make it by the 1/4 or 1/8 pound.)
1 Pound Angel Hair Pasta
4 Spicy Italian Sausages
1 Cup reserved water
6 Cups fresh spinach
2 Cups edamame
1 Cup parmesan
1-2 Lemons juiced and zested
Salt and freshly ground pepper to taste

Directions:
Bring a salted pot of water to a boil. Once it is boiling, cook the pasta according to the package directions. Before you drain the water, reserved 1 cup of the starchy water. Don’t forget this step! Otherwise, your pasta will be very dry and you'll have to substitute it with olive oil and then you'll just have an oily mess...not appetizing.
While the water is coming to a boil, cook the sausages in a pan with some oil. Cook them on both sides, until they are cooked all the way through, about 10-15 minutes. Cut the sausage up into pieces once it is cooked.
Meanwhile, in a pan with some olive oil, cook the spinach and edamame until the spinach is wilted.
Combine all of the ingredients in a bowl and toss so that everything is evenly distributed.


This dish tastes light and fresh with the greens and the lemon but the sausage gives it a certain heartiness. It is quickly becoming my new staple on busy nights when I’m buried under homework and readings. We all have days like that and this pasta can spare you some extra time to get all of your work done, without sparing any deliciousness.

Sunday, February 7, 2010

Color My Plate

I’m a sucker for a beautiful presentation. Especially if it’s easy to achieve! I saw a picture of this salad and immediately decided I had to try it and reading the recipe only gave me more conviction. Yes, this is probably more of a summer recipe, but maybe if you make it, you’ll feel like it is summer and all of the cold and rain will melt away.

Purple Cabbage and Citrus Salad
Adapted from Veggie Wedgie

Ingredients:
1/2 Small purple cabbage
2 Navel oranges, supremed
2 Blood oranges, supremed
1 Avocados
Alfa alfa sprouts (as much as you’d like)
1 Lemon, juiced
3 Tablespoons olive oil
Salt to taste

Directions:
Chop the cabbage into shreds. Supreme the oranges by cutting off the ends and the rind and then cutting the pulp out of the membrane. This video will help if you’ve never supremed an orange. Cut the avocado into slices or smaller pieces. Combine the cabbage, oranges, avocado, and sprouts in a bowl and top with the lemon juice, olive oil and salt. Toss and serve


This is such a great alternative to a classic green salad. The colors are exciting and the taste is unique. Purple cabbage is a favorite flavor of mine and combined with the earthy flavor of the sprouts and the bite of the citrus, this salad is definitely a crowd pleaser. I made it a second time and added grapefruit and a few tablespoons of balsamic vinegar! Mmm. A perfect meal to brighten up your plate!

Friday, February 5, 2010

And You Thought The Cupcake Craze Was Over

Yes, I went back. Are you surprised? My previous post about Let Them Eat Cake was certainly not my last.

Let Them Eat Cake
423 L Street - Suite B
Davis, CA 95616
530-750-CAKE

Amy-Winehouse: "Boozy orange cake with a beehive of dark chocolate-orange buttercream." Chocolate and orange! So delicious. This wasn't the best flavor I've had from there, but it was tasty. Seriously Aggies, go check this place out!